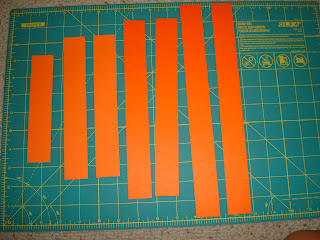
I found these paper pumpkins from Hostess with the Mostess. I loved the heart garland I did for my Valentine's Day Party, so I though this would be a great fall version, and they are very easy to make.
What you need:
12"x12" or 8"x11" sheets of paper in orange and green
Paper cutter (or scissors and a ruler)
Stapler or paperclips
String
Directions:
Cut one inch strips from the orange paper. I used 12x12 because I scrapbook and have tons of paper. I had enough strips from one sheet for 2 pumpkins and a few extra strips.
Then cut the strips into the following lengths:
One 12 inch, two 10 inch, two 8 inch and one 7 inch. I also tried various other sizes to make the final shape of the pumpkin different.
Hold all of the strips together with the ends flush, put them in size order with smallest one in the middle and the largest on the outside. Staple or paper clip the flush ends of the strips. Then make the strips on the other side, line up and staple them together.
For the leaves I folded a sheet of green paper in half and made a sort of bunny ear shape with the fold at the 'bottom of the ears'. Then I made a slit in the middle and slid it on top of the pumpkin. The original pin suggested you make the bunny ears with an extra trunk at the bottom so you can tape that to the top of the pumpkin on both sides.


I think I'd try curling the bottom point up instead of down so it has less of a Christmas ornament shape and more of a pumpkin bottom shape.
ReplyDelete