Friday, December 28, 2012

Printable Subway Art

I've been debating on following the trend of placing subway art in a picture frame on the mantel,  but at my house no one sees the mantel so it seemed kinda pointless. For a friends Christmas present I decided it was the perfect way for her to start decorating her house.

I found printable Subway Art for almost every holiday or season and even created a few monogrammed ones. Below are pictures of each printable in the frame and the links to the original blogs they came from.

I printed all of them out in 8.5" X 11" because not all of the ones I liked came in a 16" X 20" version. But the larger size is very popular.  I found an 8.5" X 11" frame at Micheal's, which made it much easier since I didn't have to trim any of the papers for an 8x10 frame.

Click the Links below to jump to a section.

New Year's
Valentine's Day
St. Patty's Day
Summer
Fall/Thanksgiving
Christmas
Monogram's


New Year's:
From eighteen 25- 16x20


Valentine's Day:

From Designs by CP- 8x10 or email her to get a new 


St. Patrick's Day:

From eighteen 25- 16x20


Summer:
From eighteen 25- 16x20 


Fall/ Thanksgiving:
From Pink Ink Doodle- 8x10 


Christmas:
From eighteen 25- 16x20

From Eye Candy Event Details- ideal for 8x10 but could be 11x14

From Smile Like You Mean It, It comes in 8x10 and 11x14


Monogram's:
From For Chic Sake- 8.5x11
These monogram printables come in 3 styles and multiple colors
Only 1 i did actually turned out well. I think it would be best to save the .pdf as a .jpeg before taking it to print so the letters don't get messed up.


Wednesday, November 21, 2012

Large Paper Ornaments

Like many people who have crafty blogs, I love the Christmas season. The cold weather, twinkling lights, decorations and holiday music make the month after thanksgiving the best time of the year.
I get a little craft crazy this time of year and make way too many decorations.

These paper ornaments from Curbly are similar to the paper pumpkins I made in October. I love these because they are super cheap and quick.


What You Need: 

12x12 scrapbook paper with a color or pattern on both sides
Paper cutter
Hole Punch
Brads


Directions: 

Cut the paper into 1" strips.  Keep two of them 12" long, two at 10" and one at 8".  I also tried a few ornaments with different sizes to make them different shapes.

Hold all of the strips together with the ends flush, put them in size order with smallest one in the middle and the largest on the outside. Hole punch the flush ends of the strips and secure with a brad. Then make the strips on the other side, line up and hole punch them again and secure with a brad.

I stapled the pumkpins and a few of the ornaments but one comment on the original post made a great point about them being easily stored at the end of the season if you make them with the brads.


Thursday, November 15, 2012

Ribbon Christmas Tree

These ribbon Christmas trees from Michaels are another cheap craft that can be made to match any decor.  I think I might make a few in different sizes.


What you need:
3 or 4 kinds of ribbon  (1 inch width or more works best, 4 yards of each is enough with 4 types of ribbons)
Stryofoam Cone (mine was 3"x11")
Sequin Pins


Directions:
Cut ribbon into 4-inch pieces.  Starting at the base of the cone, fold ribbon pieces in half and use sequin pins to attach to the cone, placing each loop next to the previous loop. Continue until cone is completely covered with ribbon loops.


Tuesday, November 6, 2012

Paper Ornaments: Flower Shaped

These flower inspired ornaments from How About Orange, look great with the other paper ornaments I made on this post.  I may have a gone a little paper ornament crazy.

What You Need: 
12"x12" or 8.5"x11" sheets of paper with color or a pattern on both sides
Stapler
Double stick tape, I used scrapbooking mounting squares

Directions:
Cut the paper into 1" strips. Stack them in one pile and staple together in the middle on the stack, and fold them in half like a little book.


My stapler wasn't big enough to reach the middle so I opened it up and stapled onto the sewing cutting board. Even then it wasn't strong enough to make it through all the papers so a heavy duty stapler may be worth it.  

I put a photo mounting square on the tip of the first paper and bent it toward the center.  Continue bending the papers to the center until the flower shape is finshed. 


Saturday, October 20, 2012

Upscale Veggie Tray


I mentioned in a previous post that I recently had a Stella and Dot jewelry party to support a friend who recently started as a stylist for them. I made a few recipes from Pinterest for the appetizers and couldn’t be happier about the way they turned out.  I made this grown–up veggie tray and also these South of the Border Sandwiches.

What you need:
Fresh chives

Optional veggies:
Carrots
Cumcumber
Any variety of bell peppers
Yellow squash
Red cabbage

Directions:
Thinly slice the veggies and tie them in bunches with fresh chives. Simple right? Not so much. Since I am a horrible chef; I had no idea how to go about thinly slicing some veggies. I probably could have used a veggie slicer, if I had one but instead I resorted to a regular knife.  It was fairly easy to cut the peppers in thin slices but the cucumber and carrots were very difficult. 


If you know of a better way too slice these, I would love to know. Other than my own personal difficulties with slicing the veggies, they came out really well.


Thursday, October 11, 2012

Turkey Sandwich Bites


I had a Stella and Dot jewelry party for a friend who just started as a stylist and decided to try a few recipes from Pinterest for appetizers.  I tried these South of the Border Sandwiches and a fancy veggie tray.  

What you need:
1 loaf French bread, cut into 1/2 to 3/4 inch slices
1/2 cup black olives, chopped
1/2 teaspoon chili powder
1/2 teaspoon ground cumin
1/4 teaspoon salt
1/3 cup lite mayonnaise
1/3 cup nonfat sour cream
1/3 cup green onions, chopped
1 pound sliced turkey
2 medium tomato, thinly sliced
2 ripe avocados, sliced
3/4 cup cheddar cheese, shredded
3/4 cup pepper jack or Monterey Jack cheese, shredded

Directions:
Preheat oven to 350 degrees.

In a bowl, combine olives, chili powder, cumin, salt, mayonnaise, sour cream, and green onions.
Place bread on an ungreased baking sheet and spread 1 tablespoon of the mayonnaise mixture on each slice.


Top with slices of turkey and tomatoes. Top with avocados and cheeses (I added the cheese before baking and put the avocado on after).


Bake @ 350 for 15 min.

Of course I made these and then get distracted by shiny jewelry and friends; and completely forgot to take photos of the end result. They were pretty much like the picture I pinned (below), and very delicious. I will definitely be making them again, and I will post those pictures. 

Picture from The Girl Who Ate Everything

Tuesday, October 2, 2012

Pumpkin Crumb Cake


Since everyone in the office knows I love baking, I usually get put in charge of bring treats for birthdays and other celebrations. I wanted to do something with pumpkin since its fall and I decided on this pumpkin coffee cake from my fall board.  The recipe looked great but also time consuming so I actually cheated by buying a box of crumb cake mix from Krusteaz and added canned pumpkin to it. For my first time trying to alter a box of mix, it turned out very well.


What you need:
1 box crumb cake (depending on the box of mix the ingredients may be different)
1 egg
2/3 cups water
2/3 cups canned pumpkin
1 tsp. pumpkin pie spice


Directions:
Follow the directions for the box of coffee cake mix. Adding in the canned pumpkin and pumpkin pie spice with the package of cake mix.


Saturday, September 29, 2012

Halloween Lanterns

Lots of people on Pinterest use thier fireplace and mantel to decorate seasonally. But in our house the mantel isn't a focal point and no one would ever see my awesome decorations so I decided to use lanterns on our porch.

I know that I bought the large lantern at Ikea, but I don't remember where the others are from. I made the bow myself :) which is the best one I have made yet! The filler, ribbon, and brooms were purchased at Michaels.


Tuesday, September 25, 2012

Decoupage Pumpkins


I found these really cute pumpkins on Tracy's Trinkets & Treasures, and I have a friend who loves leopard print so I needed to make one for her! Plus they are super cheap and easy to make.

 
What you need:
Craft pumpkin, any size
Tissue Paper
Mod Podge, I used matte, but glossy would work too
Fake flowers or leaves
Hot glue gun


Directions:
Clean the craft pumpkin with a damp cloth so the Mod Podge will stick better. 

I cut the tissue paper into one and two inch strips to male it easier to apply. I think squares, or circles would be easier.


After “gluing” the tissue paper onto the pumpkin with the Mod Podge, I sealed it with a layer on top.


After the whole pumpkin was covered with tissue paper I added some leaves and a flower to the top to add some decoration and to cover up ends on the paper on the top. Not really a fan of the flower, maybe just leaves next time. 


Thursday, September 20, 2012

Blue Moon Cupcakes


I made these cupcakes with a friend for her Housewarming Party and they were a huge hit. The original recipe we used was from Erica's Sweet Tooth.  

What you need: 
    For Cupcakes
3/4 cups unsalted butter, softened

1-3/4 cup sugar

2-1/2 cup flour

2 tsp baking powder

1/2 tsp salt

3 eggs, at room temperature

1 tsp vanilla

1/2 tsp orange or lime zest

1- 1/2 cups Blue Moon 
1/4 cup milk
Orange wedges for garnish

    For Frosting
12 oz cream cheese, cold
6 tbsp butter, at room temperature

1 tbsp freshly squeezed orange juice (we squeezed all we could from the orange for most flavor)
1 tsp orange zest

4 cups powdered sugar


Directions: 
Preheat oven to 375 degrees and place 24 cupcake liners in the cupcake pans

In a medium-sized bowl, whisk together the dry ingredients (flour, baking powder, and salt

In a different bowl beat together the butter and sugar with an electric mixer until light and fluffy, about 2-3 minutes. Then add the eggs one at a time, beating after each one is added. Add the vanilla and orange zest.

Combine milk and beer, and alternatively add this mixture and the flour mixture to the butter/sugar mixture with the mixer on low speed, starting and ending with the flour.  

Fill the cupcake liners 2/3 full and bake for 18 minutes.

While cupcakes are baking, cream together the cream cheese and butter in an electric mixer until smooth and creamy, about 2-3 minutes.  

Add the citrus juice and zest and gradually add the powdered sugar and beat until smooth, about 2 minutes.  

When cupcakes are done, poke holes in the tops of the cupcakes with toothpicks and brush some beer on each while still warm. 


Sunday, August 5, 2012

Paper Pumpkins

I thought I would get a jumpstart on making decorations for fall. And I was doing really well; but I never actually made any blog posts about what I made. I couldn't believe that it was a month since my last post! I have a new appreciation for all the moms and other women who work and have successful blogs. This is hard work.

I found these paper pumpkins from Hostess with the Mostess. I loved the heart garland I did for my Valentine's Day Party, so I though this would be a great fall version, and they are very easy to make.

What you need: 

12"x12" or 8"x11" sheets of paper in orange and green
Paper cutter (or scissors and a ruler)
Stapler or paperclips
String

Directions:

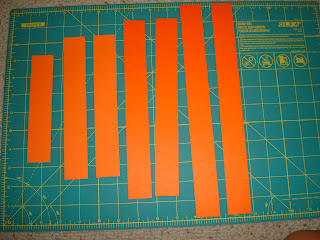
Cut one inch strips from the orange paper. I used 12x12 because I scrapbook and have tons of paper. I had enough strips from one sheet for 2 pumpkins and a few extra strips.


Then cut the strips into the following lengths:
One 12 inch, two 10 inch, two 8 inch and one 7 inch. I also tried various other sizes to make the final shape of the pumpkin different.


Hold all of the strips together with the ends flush, put them in size order with smallest one in the middle and the largest on the outside. Staple or paper clip the flush ends of the strips. Then make the strips on the other side, line up and staple them together.


For the leaves I folded a sheet of green paper in half and made a sort of bunny ear shape with the fold at the 'bottom of the ears'. Then I made a slit in the middle and slid it on top of the pumpkin. The original pin suggested you make the bunny ears with an extra trunk at the bottom so you can tape that to the top of the pumpkin on both sides.